Exercises and Project 2
30/03/18 - 12/07/18
(Week 1 - Week 3)
Module: 3D Modelling
Tulekova Arailym (0326122)

(Week 1 - Week 3)
Module: 3D Modelling
Tulekova Arailym (0326122)

Week 1
30 march


Week 2
6 april

fig.2.


Week 3
13 april


fig.3.2.
Week 4
20 april
 fig.4.
Week 5
27 april
 Ambient Lights
In real life, ambient light is the widely distributed, "indirect" light that has bounced off (or been transmitted through) objects in your scene. Ambient light illuminates even the areas not directly lit by another light source. Shadowed areas of a real room are sometimes made visible only by the ambient light.

 Directional Lights
A directional light sets a single vector for all its illumination and hits every object from the same angle, no matter where the object is located. All the shadows cast by a directional light are cast in the same direction and are orthogonal projections of each object's shape.
 Point Lights
A point light simulates rays shining out from one infinitely small point in space.
Point lights emit light uniformly in all directions, like a bare light bulb or glowing star in space.

 Spot lights
 fig 5. 4.
 Area Lights
In Maya, area lights are two-dimensional rectangular light sources. Use area lights to simulate the rectangular reflections of windows on surfaces. Compared to other light sources, area lights can take longer to render, but they can produce higher quality light and shadows. Area lights are particularly good for high-quality still images, but less advantageous for longer animations where rendering speed is crucial.
 fig 5. 5.
 Volume Lights
Project 2
Week 8
18 may


Week 9
25 may


Week 10
1 june
30 march
Today was the first class where our lecturer introduced us to this subject. We were told what projects we will be doing and showed a couple of works of our seniors.
Mr. Kannan told us what type of assignments we will have and introduced us to a new program with which we will work throughout the semester.
It is called Maya and in it we will build our models.
The lecturer showed us the main comands of the program and how to use ithem. Also, Mr posted the picture of short cut keys so that we could work more quickly in the program.
Mr.Kannan told us to practice a lot with Maya. At least 1-2 hours a day.
On this day, we had to draw something to evaluate our abilities in understanding the perspective and volume. I drew revolver.

fig.1. Sketch of revolver.
Week 2
6 april
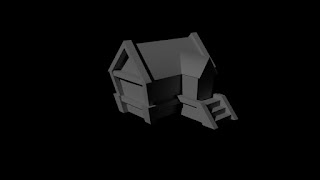
This lesson began with the task the teacher asked us to model the house in 30 minutes. I prefer to use laptops that are in the university, because my laptop is weak and constantly lags.
fig.2.
After our time has expired the lecturer began to show an easy and quick way to build the same house. Mr. Kannan told us to pay less attention to the texture and small details and try to see in everything a simple form with the help of which it will be possible to build it.
Teacher showed us how to use such tools as extrude,bevel, boolen and other.
Also the lecturer advises us to do smoothing only at the end for the final work.
fig 2.2.
I find Multi-cut tool the most helpful in model building. For exampe in fog.2.3 second box with one division only , second with 3 division in contact so you can clearly see the angle between cube and cylinder.

fig 2.3.
13 april
Today we learned to impose textures on our models. To put textures on model need to use
"hypershade" tool. First of all we need to choose one of materials from a lot of variations with different purposes. Usually we use lambert.

fig.3.
After we decide with material to put picture from your computer we need to click on black and white box opposite to "color" and choose image from folder.
fig.3.2.
Week 4
20 april
In the fourth week, Ms. Kannan showed useful tricks how to make a wire with the help of a extrusion and curves. I Used this trick in my first project.

Week 5
27 april
Today the lecturer explained how to use light in the programm and how it affects the final model. We were asked to test all types of lighting and tell what their difference. We were also explained how to arnold render and it's the way of nicer rendering.
Ambient LightsIn real life, ambient light is the widely distributed, "indirect" light that has bounced off (or been transmitted through) objects in your scene. Ambient light illuminates even the areas not directly lit by another light source. Shadowed areas of a real room are sometimes made visible only by the ambient light.

fig 5.1.
Directional LightsA directional light sets a single vector for all its illumination and hits every object from the same angle, no matter where the object is located. All the shadows cast by a directional light are cast in the same direction and are orthogonal projections of each object's shape.

fig 5.2.
Point LightsA point light simulates rays shining out from one infinitely small point in space.
Point lights emit light uniformly in all directions, like a bare light bulb or glowing star in space.

fig 5.3
Spot lights
Spot lights are a basic staple of most lighting designs in computer graphics. A spot light can aim light at a specific target.
A spot light simulates light radiating from a point, much like a point light.
 Area Lights
In Maya, area lights are two-dimensional rectangular light sources. Use area lights to simulate the rectangular reflections of windows on surfaces. Compared to other light sources, area lights can take longer to render, but they can produce higher quality light and shadows. Area lights are particularly good for high-quality still images, but less advantageous for longer animations where rendering speed is crucial.
 Volume Lights
A major advantage of using a volume light is that you have a visual representation of the extent of the light (the space within which it is bound). The falloff of light in the volume can be represented by the color ramp (gradient) attribute in Maya, which prevents the need for various decay parameters, and also provides additional control. The color gradient is also useful for volume fog.
Project 2
Week 8
18 may
I made a couple of sketches of anthropomorphic animals.


Week 9
25 may
For the next project we need to do something organic. This assignment is for us to practice in creating organic forms and applying textures.


Week 10
1 june
For my model, I chose an anthropomorphic fox-phenyk. I often draw this character and decided that I want to try to model it.
I colored every part of body by unfolding it and saving it in png. Then I opened it in Paint tool Sai and colored it according to color of an animal. Then I putted it inside of model


Comments
Post a Comment